After going through the entire MVC architecture, you are probably itching to move on to a real project. But wait, there is still something we must talk about first.
At the end of the controller's lesson, we went over the entire lifecycle of a GET request.
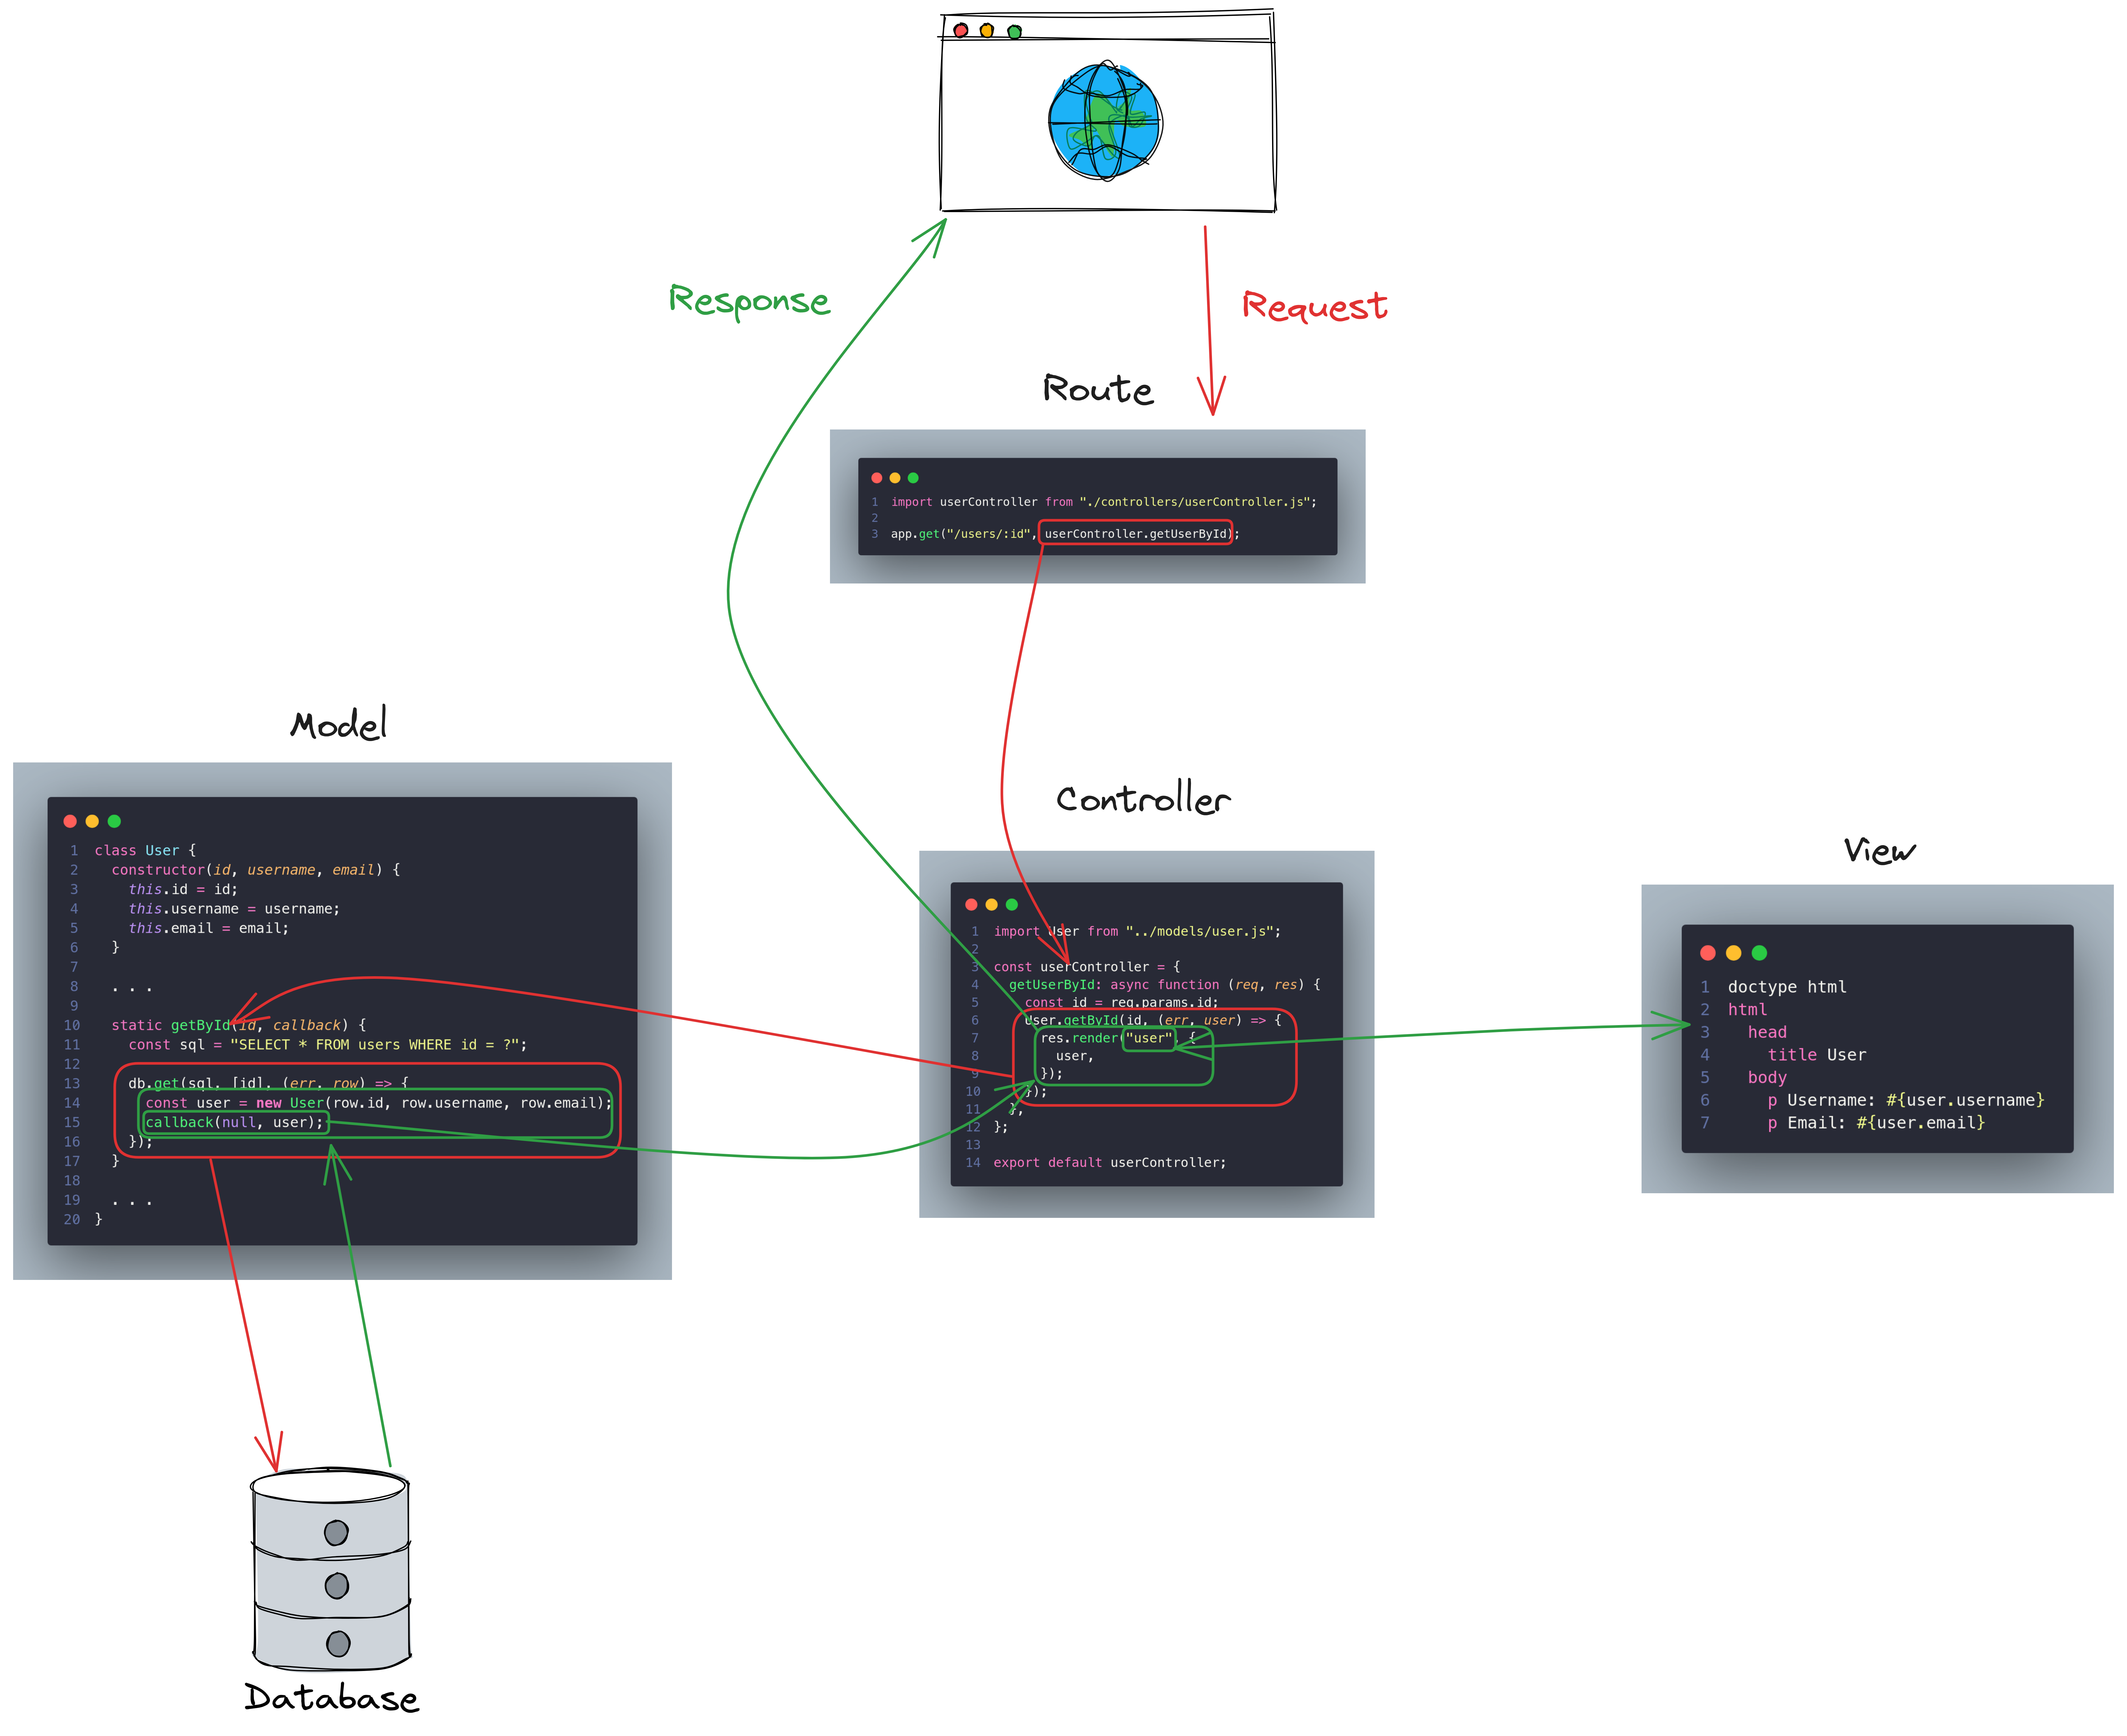
But in practice, you must also consider how to POST data to the backend. Previously, we relied on Thunder Client to do this, but obviously, to create a fully featured web application, you'll need an actual user interface.
As a refresher, recall that this is our project structure:
1.
2├── controllers
3│   └── userController.js
4├── database.sqlite
5├── index.js
6├── models
7│   └── user.js
8└── views
9    ├── index.pug
10    ├── layout.pug
11    └── user.pug
Inside the user.js model, there are five functions that enable you to interact with the corresponding users table.
models/user.js
1class User {
2  constructor(id, username, email) {
3    this.id = id;
4    this.username = username;
5    this.email = email;
6  }
7
8  static getAll() {. . .} // Get all user items in the table.
9  static getById() {. . .} // Get a single user item based on id.
10  static create() {. . .} // Create a new user, and save it in the database.
11  static update() {. . .} // Update an existing user item.
12  static delete() {. . .} // Remove a user item from the database.
13}
And lastly, these are our routes:
index.js
1import express from "express";
2import userController from "./controllers/userController.js";
3
4const app = express();
5const port = 3001;
6
7app.use(express.json()); // MIddleware that allows Express to parse request body in JSON
8app.use(express.urlencoded({ extended: true })); // Middleware that allows Express to parse request body in FormData
9
10app.set("views", "./views"); // Defines the location of the view templates
11app.set("view engine", "pug"); // Defines the template engine
12
13// The homepage
14app.get("/", (req, res) => {
15  res.render("index");
16});
17
18// The user routes
19app
20  .route("/users")
21  .get(userController.getAllUsers) // Omitted in this lesson
22  .post(userController.createNewUser);
23
24app
25  .route("/users/:id")
26  .get(userController.getUserById) // Omitted in this lesson
27  .put(userController.updateUser)
28  .delete(userController.deleteUser);
29
30app.listen(port, () => {
31  console.log(`App listening on port ${port}. Visit http://localhost:${port}.`);
32});
Notice that we added a new middleware, express.urlencoded(). Since we are using forms to send the requests, this middleware allows Express to process form data, instead of only JSON.
For this lesson, our focus will be on the views and controllers. We are going to discuss how to create a user interface that can send requests to the corresponding routs, and then how can the corresponding controllers process the transferred data.
Using HTML form to POST data
To begin with, let's create a form in our homepage. This form will be in charge of creating a new user by sending a POST request to route /users. For example:
views/index.pug
1extends layout.pug
2
3block meta
4  title Home
5
6block content
7  form(action="/users", method="post")
8    label(for="username") Username:
9    input(type="text", name="username", id="username")
10    label(for="email") Email:
11    input(type="email", name="email", id="email")
12    input(type="submit", value="Submit")
controllers/userController.js
1import User from "../models/user.js";
2
3const userController = {
4  getUserById: async function (req, res) {. . .},
5  getAllUsers: async function (req, res) {. . .},
6
7  createNewUser: async function (req, res) {
8    const { username, email } = req.body;
9    User.create(username, email, (err, userID) => {
10      res.redirect(`/users/${userID}`);
11    });
12  },
13
14  updateUser: async function (req, res) {. . .},
15  deleteUser: async function (req, res) {. . .},
16};
17
18export default userController;
Start the dev server, open the browser, and visit http://localhost:3001.
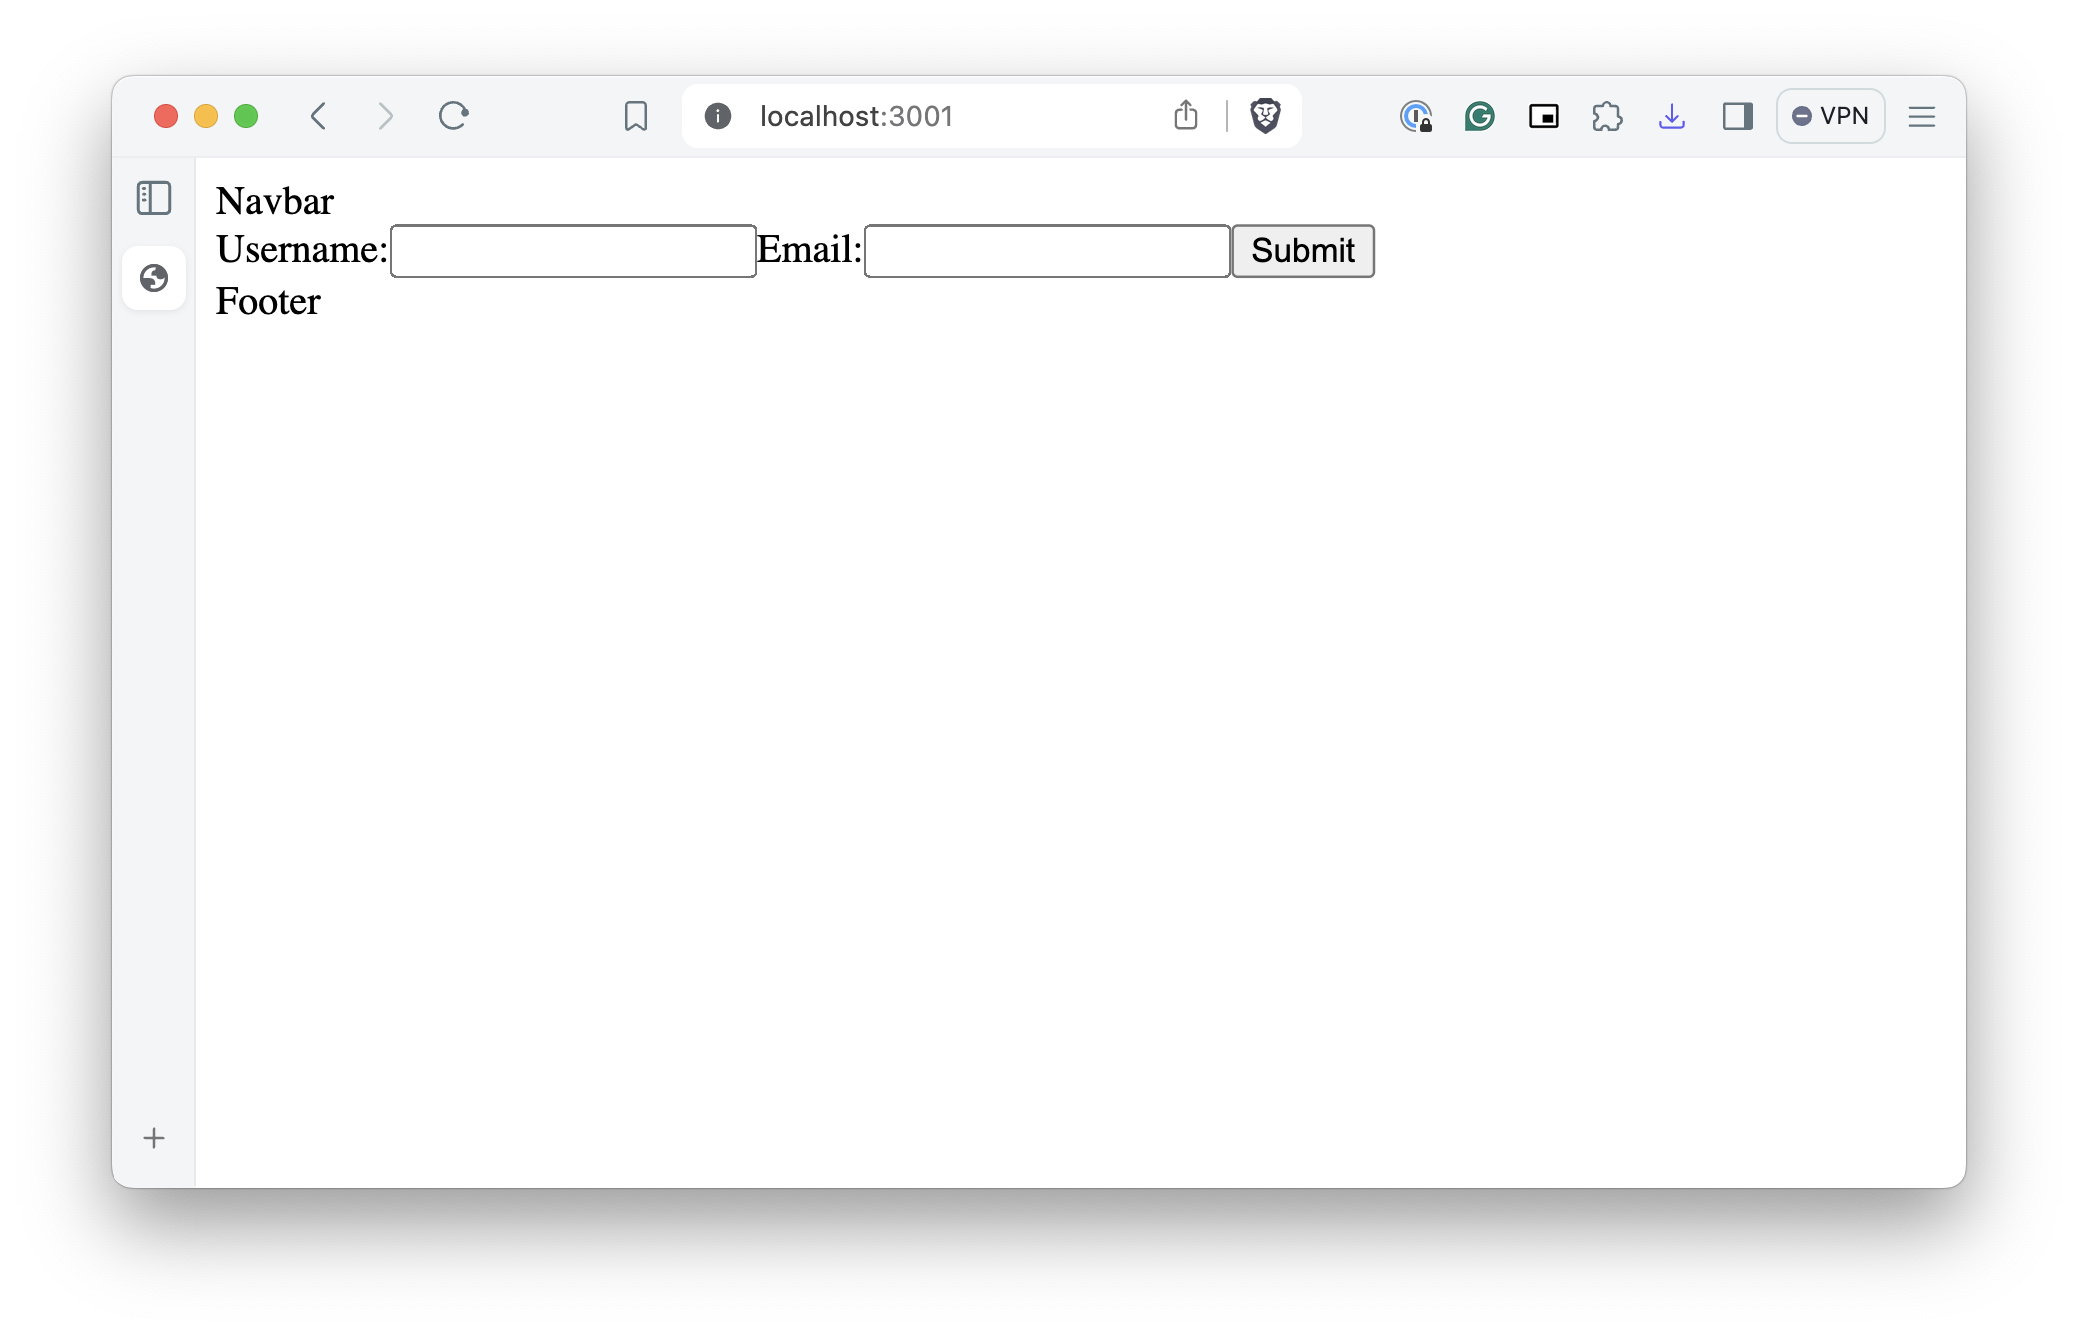
The following HTML form is rendered:
1<form action="/users" method="post">
2  <label for="username">Username:</label>
3  <input type="text" name="username" id="username" />
4
5  <label for="email">Email:</label>
6  <input type="email" name="email" id="email" />
7
8  <input type="submit" value="Submit" />
9</form>
When the Submit button is clicked, Your browser will wrap up the user input, and send the data to the /users endpoint, in the form of a POST request.
And then, in the backend, Express will use the express.urlencoded() middleware to parse the request body, which allows the controllers to retrieve the corresponding variables username and email.
index.js
1app.use(express.urlencoded({ extended: true }));
2
3app
4  .route("/users")
5  .get(userController.getAllUsers)
6  .post(userController.createNewUser); // <===
controllers/userController.js
1createNewUser: async function (req, res) {
2  const { username, email } = req.body;
3  User.create(username, email, (err, userID) => {
4    res.redirect(`/users/${userID}`);
5  });
6},
Finally, the model method User.create() will use those variables to create a new user record in the database.
Form encoding
Before we move on to discussing how to use JavaScript to send form data, we need to talk about form encoding. There are two most common encoding types available, application/x-www-form-urlencoded and multipart/form-data. Unless otherwise specified, your browser will use application/x-www-form-urlencoded by default.
Using the application/x-www-form-urlencoded method, the browser will use a string of key/value pairs to represent the form data inside the POST request, which looks like this:
1username=test&email=test%40example.comDifferent key/value pairs are separated by an ampersand (&).
However, there is a problem with this encoding methods. You cannot transfer files, because everything will be converted into a string.
To deal with files, you need to use the multipart/form-data encoding instead by specifying the enctype attribute.
1<form action="/upload" method="POST" enctype="multipart/form-data">
2  <label for="username">Username:</label>
3  <input type="text" id="username" name="username" />
4
5  <label for="file">Choose file:</label>
6  <input type="file" id="file" name="file" />
7
8  <input type="submit" value="Upload" />
9</form>
Of course, you also need to make changes in the backend so that it parses the request body. But that is a topic for our next lesson. For now, we only need to worry about submitting non-file data.
Using JavaScript to POST data
To submit data with JavaScript, you need to first embed JavaScript code into your Pug template.
1extends layout.pug
2
3block meta
4  title Home
5
6block content
7
8  form(id="myForm")
9    label(for="username") Username:
10    input(type="text", name="username", id="username", value="")
11    label(for="email") Email:
12    input(type="email", name="email", id="email", value="")
13    input(type="submit", value="Submit")
14
15  script.
16    document.addEventListener('DOMContentLoaded', function() {
17        . . .
18    });
Notice that you must use script. instead of script. The dot cannot be left out.
First of all, you need to select the form, the username input, and the email input, and set up the corresponding event handlers.
1document.addEventListener("DOMContentLoaded", function () {
2  const form = document.querySelector("form");
3  const usernameInput = document.getElementById("username");
4  const emailInput = document.getElementById("email");
5
6  usernameInput.addEventListener("input", function () {});
7  emailInput.addEventListener("input", function () {});
8  form.addEventListener("submit", async function (event) {});
9});
And also, we need to use the constructor URLSearchParams() in order to deal with the form data using the application/x-www-form-urlencoded method.
1document.addEventListener("DOMContentLoaded", function () {
2  const form = document.querySelector("form");
3  const usernameInput = document.getElementById("username");
4  const emailInput = document.getElementById("email");
5
6  const formData = new URLSearchParams();
7
8  usernameInput.addEventListener("input", function () {});
9  emailInput.addEventListener("input", function () {});
10  form.addEventListener("submit", async function (event) {});
11});
Inside the usernameInput and the emailInput handlers, you need to pass the corresponding user input to our formData. In this example, we use the set() method to pass the value of usernameInput to the key username.
1document.addEventListener("DOMContentLoaded", function () {
2  const form = document.querySelector("form");
3  const usernameInput = document.getElementById("username");
4  const emailInput = document.getElementById("email");
5
6  const formData = new URLSearchParams();
7
8  usernameInput.addEventListener("input", function () {
9    formData.set("username", usernameInput.value); // <===
10  });
11
12  emailInput.addEventListener("input", function () {
13    formData.set("email", emailInput.value); // <===
14  });
15
16  form.addEventListener("submit", async function (event) {});
17});
And lastly, inside the form event listener, we use the fetch() method to make a POST request to the endpoint /users.
1document.addEventListener("DOMContentLoaded", function () {
2  const form = document.querySelector("form");
3  const usernameInput = document.getElementById("username");
4  const emailInput = document.getElementById("email");
5
6  const formData = new URLSearchParams();
7
8  usernameInput.addEventListener("input", function () {
9    formData.set("username", usernameInput.value);
10  });
11
12  emailInput.addEventListener("input", function () {
13    formData.set("email", emailInput.value);
14  });
15
16  form.addEventListener("submit", async function (event) {
17    event.preventDefault(); // Prevent the default form submission action
18
19    await fetch("/users", {
20      method: "POST",
21      body: formData.toString(),
22      headers: {
23        "Content-Type": "application/x-www-form-urlencoded",
24      },
25    });
26  });
27});
There are two things you have to pay extra attention here. First, you have to convert formData to a string, which is a requirement for the application/x-www-form-urlencoded encoding type.
And also, you need to set Content-Type to application/x-www-form-urlencoded inside the request header. If you are using an HTML form, this will be automatic, but here, you have to do it manually.
This header tells Express that it should process the request body using the express.urlencoded() middleware.
Using JavaScript to PUT data
So why use JavaScript to send data at all? Because as you can see from our example, JavaScript has only made things more complex. We added a lot more code just to send a form with two inputs.
That is because even though the PUT and DELETE methods have existed for a long time, HTML forms still only support GET and POST requests.
Many frameworks offer workarounds. For example, in Laravel, you can create a POST form and then add an @method("PUT") directive.
1<form method="POST" action="/your-endpoint/{{$model->id}}">
2    @csrf
3    @method('PUT')
4
5    <label for="username">Username:</label>
6    <input type="text" id="username" name="username" value="{{$model->username}}">
7
8    <label for="email">Email:</label>
9    <input type="email" id="email" name="email" value="{{$model->email}}">
10
11    <input type="submit" value="Submit">
12</form>
However, this feature is missing in Express.js. So instead, you can either design your endpoints differently so that you only need GET and POST. For instance,
1app
2  .route("/users")
3  .get(userController.getAllUsers)
4  .post(userController.createNewUser);
5
6app
7  .route("/users/new")
8  .get(userController.newUser) // Display the form that allows you to create a new user
9  .post(userController.createNewUser); // Create the new user
10
11app
12  .route("/users/edit/:id")
13  .get(userController.editUser) // Display the form that allows you to edit the user
14  .post(userController.updateUser); // Update the user
15
16app
17  .route("/users/delete/:id")
18  .get(userController.editUser) // Display the form that allows you to delete the user
19  .post(userController.updateUser); // Delete the user
20
21app.route("/users/:id").get(userController.showUser); // Display the user detail
Or alternatively, you can rely on JavaScript to send a PUT request, similar to our previous example.
index.js
1app
2  .route("/users/:id")
3  .get(userController.getUserById)
4  .put(userController.updateUser) // <===
5  .delete(userController.deleteUser);
controllers/userController.js
1updateUser: async function (req, res) {
2  const { username, email } = req.body;
3
4  User.update(req.params.id, username, email, (err, userID) => {
5    res.redirect(303, `/users/${userID}`);
6  });
7},
views/user.pug
1extends layout.pug
2
3block meta
4  title User #{user.username}
5
6block content
7  p Username: #{user.username}
8  p Email: #{user.email}
9
10  form(id="myForm")
11    label(for="username") Username:
12    input(type="text", name="username", id="username", value=`${user.username}`)
13    label(for="email") Email:
14    input(type="email", name="email", id="email", value=`${user.email}`)
15    input(type="submit", value="Submit")
16
17  script.
18    . . .
This time, we are creating a form inside the user.pug template, and notice that the value attributes for the username input and the email input have their initial values.
Also note that data interpolation inside attributes needs to use template literals (${}), instead of the regular #{}.
Next, let's take a look at the corresponding JavaScript code. A few things are modified here for the PUT request.
1const userID = JSON.parse("!{JSON.stringify(user.id)}");
2
3document.addEventListener("DOMContentLoaded", function () {
4  const form = document.getElementById("myForm");
5  const usernameInput = document.getElementById("username");
6  const emailInput = document.getElementById("email");
7
8  const formData = new URLSearchParams();
9  formData.set("username", usernameInput.value);
10  formData.set("email", emailInput.value);
11
12  usernameInput.addEventListener("input", function () {
13    formData.set("username", usernameInput.value);
14  });
15
16  emailInput.addEventListener("input", function () {
17    formData.set("email", emailInput.value);
18  });
19
20  form.addEventListener("submit", async function (event) {
21    event.preventDefault(); // Prevent the default form submission
22
23    await fetch(`/users/${userID}`, {
24      method: "PUT",
25      body: formData.toString(),
26      headers: {
27        "Content-Type": "application/x-www-form-urlencoded",
28      },
29    });
30  });
31});
Line 1, we need to retrieve the user id first. But things are a bit more complicated, because you need to pass the data from the Pug template to JavaScript.
In this example, !{} is different interpolation operator for Pug, similar to #{}, except the values will be unescaped. Meaning the special characters such as { or " will be printed directly, instead of converted into their corresponding HTML entities.
Next, JSON.parse() parses the values and convert it back into JSON, and this time, the parsed value will be returned to the variable userID, allowing us to access it later.
Line 8 to 10, the formData needs to keep the initial values, just in case the user saves the form without making any changes. If this is not done, the username and email will be set to null.
Line 23, use the userID we just retrieved in line 1 to set the correct endpoint.
Line 24, change the method to PUT.
Using JavaScript to DELETE data
Lastly, to delete a user record, you need to create another form in the user.pug template.
index.js
1app
2  .route("/users/:id")
3  .get(userController.getUserById)
4  .put(userController.updateUser)
5  .delete(userController.deleteUser); // <===
controllers/userController.js
1deleteUser: async function (req, res) {
2  User.delete(req.params.id, (err) => {
3    res.redirect(303, `/`);
4  });
5},
views/user.pug
1extends layout.pug
2
3block meta
4  title User #{user.username}
5
6block content
7  p Username: #{user.username}
8  p Email: #{user.email}
9
10  form(id="myForm")
11    label(for="username") Username:
12    input(type="text", name="username", id="username", value=`${user.username}`)
13    label(for="email") Email:
14    input(type="email", name="email", id="email", value=`${user.email}`)
15    input(type="submit", value="Submit")
16
17  form(id="delete")
18    input(type="submit", value="Delete User")
19
20  script.
21 . . .1const userID = JSON.parse("!{JSON.stringify(user.id)}");
2
3document.addEventListener("DOMContentLoaded", function () {
4 . . .
5
6 const deleteForm = document.getElementById("delete");
7
8 deleteForm.addEventListener("submit", async function (event) {
9 event.preventDefault(); // Prevent the default form submission
10
11 await fetch(`/users/${userID}`, {
12 method: "DELETE",
13 headers: {
14 "Content-Type": "application/x-www-form-urlencoded",
15 },
16 });
17 });
18});