There is one more improvement we can make to our blog application before we move on to the next step, that is to integrate our old models setup with an ORM framework.
There are some issues with our old setup. For example, notice that all the methods that are in charge of interacting with the database, such as create(), update(), delete(), and so on, they all rely on SQL queries. This will require you to have a decent understanding of SQL.
1static create(username, email, callback) {
2  const sql = "INSERT INTO users (username, email) VALUES (?, ?)"; // <===
3  db.run(sql, [username, email], function (err) {
4    callback(null, this.lastID);
5  });
6}
And also, we did not implement a way to make changes to an existing database table.
Recall that in one of the previous lessons, in order to add a new picture column to the users table, we deleted the old database to get a fresh start. In practice, you should always avoid doing that, especially in the production environment.
Overall, it is just a headache to implement everything ourselves, and the ORM framework is here to make our lives easier.
What is an ORM
ORM, which stands for Object-Relational Mapping, is a type of tools that allow you to work on databases on a higher level, by providing interfaces that are much easier to understand than SQL queries.
Essentially, an ORM does the same job as the user.js and post.js models we created before in our examples, except it is usually packed with more features. And because there is always a big community behind an ORM framework, you are less likely to encounter bugs. And the best part is, you don't have to write anything yourself.
There is an ORM framework for almost every language, and for JavaScript, you have many options, such as Sequelize, TypeORM, Drizzle, Prisma, and so on. In this course, we are using Prisma as an example, and we will be adding tutorials on the other ORM frameworks in the community section in the future.
Getting started with Prisma
To begin with, let's install the Prisma package with the following command:
1npm install prisma --save-devAnd then set up the Prisma ORM. The --datasource-provider flag specifies the type of database that you want Prisma to connect to, which in our case, is SQLite.
1npx prisma init --datasource-provider sqliteTwo files should be created after running this command.
1.
2├── .env               <===
3├── controllers
4├── database.sqlite
5├── index.js
6├── libs
7├── models
8├── package-lock.json
9├── package.json
10├── prisma
11│   └── schema.prisma  <===
12├── routes
13├── statics
14├── uploads
15└── views
The .env is where the environmental variables will be stored. These are the global variables that will be accessible anywhere inside your project.
Inside this .env file, there should be a DATABASE_URL variable. Make sure it points to our database.sqlite file. Later, Prisma will use this variable to make a connection to our database.
You are free to use either absolute or relative paths here. The relative path would be relative to the schema.prisma file. Just make sure it starts from the protocol file:. In our example, we'll try to keep things simple and use the relative path.
1DATABASE_URL="file:./database.sqlite"In this case, the database.sqlite will be created under prisma when you run the database migration for the first time.
1.
2├── .env
3├── controllers
4├── database.sqlite
5├── index.js
6├── libs
7├── models
8├── package-lock.json
9├── package.json
10├── prisma
11│   ├── schema.prisma
12│   └── database.sqlite  <===
13├── routes
14├── statics
15├── uploads
16└── views
Creating a schema
However, before you do that, we need to take a closer look at the schema file, schema.prisma. Previously, we used an SQL query to initialize the database like this:
1db.serialize(() => {
2  db.run(
3    `CREATE TABLE IF NOT EXISTS posts (
4        id INTEGER PRIMARY KEY AUTOINCREMENT,
5        title TEXT,
6        content TEXT,
7        picture TEXT
8      )`
9  );
10});
We can do the same thing using Prisma.
schema.prisma
1generator client {
2  provider = "prisma-client-js"
3}
4
5datasource db {
6  provider = "sqlite"
7  url      = env("DATABASE_URL")
8}
9
10model User {
11  id    Int     @id @default(autoincrement())
12  email String  @unique
13  name  String
14}
15
16model Post {
17  id          Int      @id @default(autoincrement())
18  title       String
19  content     String
20  image       String
21  isPublished Boolean  @default(false)
22  createdAt   DateTime @default(now())
23}
In this example, we created schemas for two tables, User and Post.
The User table comes with three columns, id, email, and name. The id should be an integer (Int), and it will be the primary key of the table (@id), meaning this is the column used for indexing the whole table. With every new user, the id key should automatically increment (@default(autoincrement())).
As for the email and name, they are both strings (String), and the email should be unique (@unique), meaning there cannot be two users with the same email.
For the Post table, the isPublished column takes a Boolean value, which defaults to false. createdAt stores the date and time that this particular post is created, and it will be automatically generated by now().
Running migrations
Next, we need to apply this schema to our database. The technical term for this is called running database migrations.
Run the database migration using the following command:
1npx prisma migrate devYou will be asked to provide a name for the migration. Choose your desired name, and hit Enter.
1The following migration(s) have been created and applied from new schema changes:
2
3migrations/
4 └─ 20240418212903_init/
5 └─ migration.sql
6
7Your database is now in sync with your schema.
8
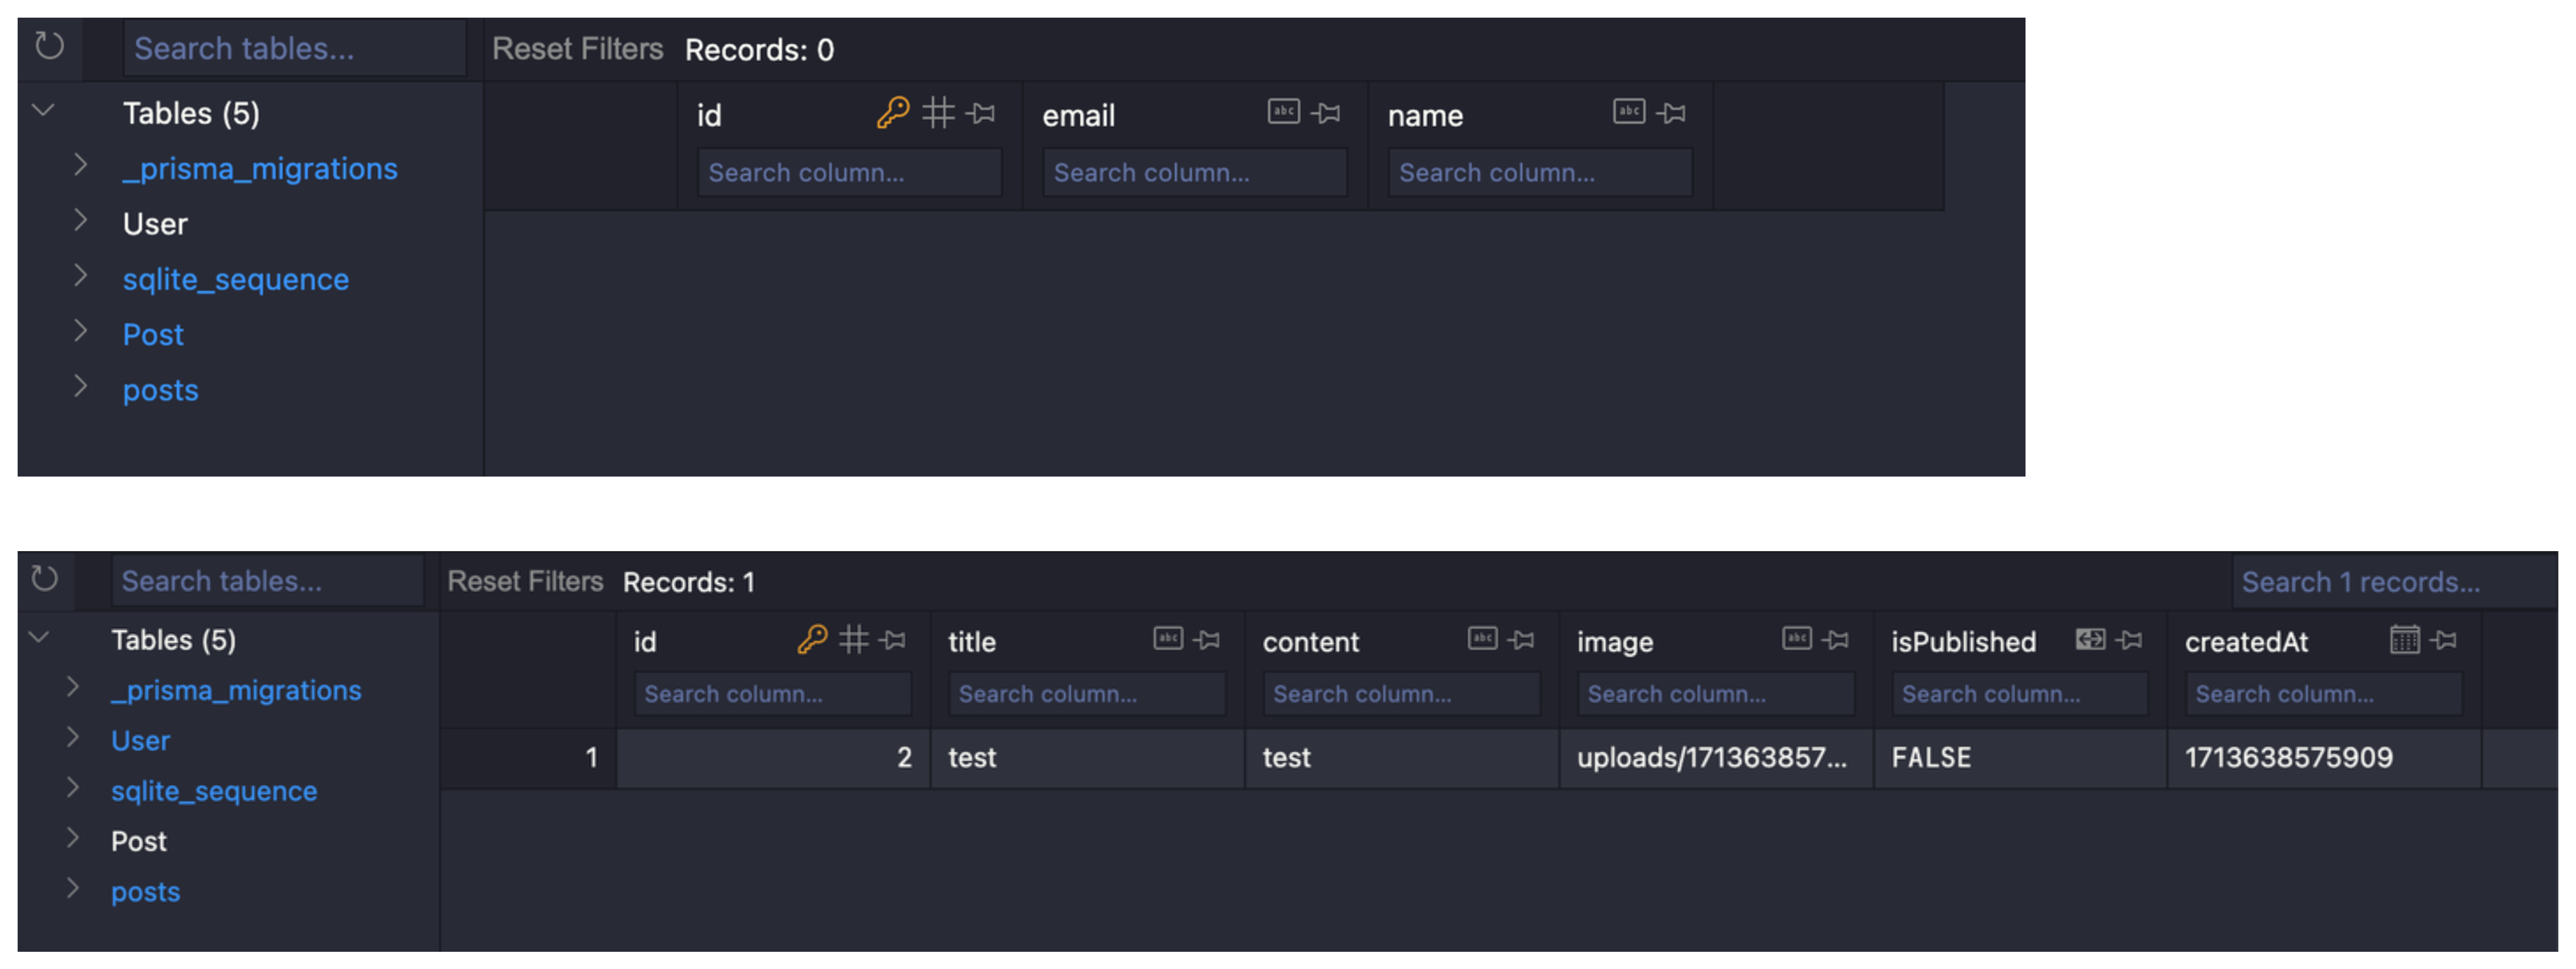
9✔ Generated Prisma Client (v5.12.1) to ./node_modules/@prisma/client in 57msIf the migration is successfully applied, your database should look like this:
One major benefit of using a ORM such as Prisma is that it will track the changes you make to the schema. For example, let's make the content column of the post table optional, by adding a question mark (?).
1model Post {
2  id          Int      @id @default(autoincrement())
3  title       String
4  content     String?
5  image       String
6  isPublished Boolean  @default(false)
7  createdAt   DateTime @default(now())
8}
And run the migration.
1npx prisma migrate dev1The following migration(s) have been created and applied from new schema changes:
2
3migrations/
4 └─ 20240418214417_post_content_optional/
5 └─ migration.sql
6
7Your database is now in sync with your schema.
8
9✔ Generated Prisma Client (v5.12.1) to ./node_modules/@prisma/client in 58msTake a look at the generated migration file (migration.sql).
1-- RedefineTables
2PRAGMA foreign_keys=OFF;
3CREATE TABLE "new_Post" (
4    "id" INTEGER NOT NULL PRIMARY KEY AUTOINCREMENT,
5    "title" TEXT NOT NULL,
6    "content" TEXT,
7    "image" TEXT NOT NULL,
8    "isPublished" BOOLEAN NOT NULL DEFAULT false,
9    "createdAt" DATETIME NOT NULL DEFAULT CURRENT_TIMESTAMP
10);
11INSERT INTO "new_Post" ("content", "createdAt", "id", "image", "isPublished", "title") SELECT "content", "createdAt", "id", "image", "isPublished", "title" FROM "Post";
12DROP TABLE "Post";
13ALTER TABLE "new_Post" RENAME TO "Post";
14PRAGMA foreign_key_check;
15PRAGMA foreign_keys=ON;
This piece of SQL code will first create a new_Post table with the new schema, transfer the data from the old Post to new_Post, drop the old Post, and finally rename new_Post into Post.
The Prisma client
Notice the last line of the output when we ran prisma migrate dev.
1✔ Generated Prisma Client (v5.12.1) to ./node_modules/@prisma/client in 58msA Prisma Client is generated. This client gives us access to various methods that allow us to work with the database using JavaScript, such as retrieving, updating, or deleting a record.
To use it inside our project, you must install another package:
1npm install @prisma/clientAnd then create a connection to Prisma. This connection should be shared by different modules in our app, so let's create a prisma.js under libs. This file plays a similar role to our old db.js.
1libs
2├── db.js  <=== No longer required
3└── prisma.js  <===
libs/prisma.js
1import { PrismaClient } from "@prisma/client";
2
3const prisma = new PrismaClient();
4
5export default prisma;
Then you can use prisma inside a controller to query the database. Starting from this point, prisma will act as a replacement for our original model layer.
The CRUD operations
As we've mentioned before, besides the easy migrations, another major benefit of using an ORM is that it comes with built-in methods, which allows you to perform CRUD (Create, Read, Update, and Delete) operations to the database. This saves us a lot of trouble from writing these methods ourselves.
create()
The create() method is used to create a new record.
1import prisma from "../libs/prisma.js";
2
3const user = await prisma.user.create({
4  data: {
5    email: "johndoe@example.com",
6    name: "John Doe",
7  },
8});
prisma.user.create() means that you are creating a new record for the User table.
findUnique()
This method retrieves a single record based on the provided identifier.
1const user = await prisma.user.findUnique({
2  where: {
3    email: "johndoe@example.com",
4  },
5});1const user = await prisma.user.findUnique({
2 where: {
3 id: 1,
4 },
5});This identifier must be unique, meaning you should use either the id, or a column with the @unique flag.
1model User {
2  id    Int     @id @default(autoincrement()) // This works
3  email String  @unique                       // This works
4  name  String                                // This does not work
5}
findMany()
This method is similar to findUnique(), except you can use a non-unique identifier, and it will return a collection of records instead of a single one.
1const users = await prisma.user.findMany({
2  where: {
3    name: "John Doe",
4  },
5});
If no identifiers are provided, the method will return all records.
1const users = await prisma.user.findMany();update()
To update a record, you must provide an identifier, as well as the fields that you wish to update.
1const user = await prisma.user.update({
2  where: {
3    email: "johndoe@example.com",
4  },
5  data: {
6    name: "JD",
7  },
8});
delete()
The delete() method removes a record from the database.
1const deleteUser = await prisma.user.delete({
2  where: {
3    email: "johndoe@example.com",
4  },
5});
These are the five most fundamental methods that Prisma offers, which are very similar to the ones we created before.
Besides the examples provided in this lesson, there are also some more advanced methods that might be useful under certain situations, such as updateMany(), which allows you to update multiple records at the same time, upsert(), which will create a new method if the record to be updated does not exist in the table, and many more.
To learn more about Prisma, please head over to Prisma's official documentation.
Updating the controllers
Finally, let's update our controllers by replacing the original model methods with Prisma.
1import prisma from "../libs/prisma.js";
2
3const postController = {
4  list: async function (req, res) {},
5  show: async function (req, res) {},
6  new: async function (req, res) {},
7  create: async function (req, res) {},
8  edit: async function (req, res) {},
9  update: async function (req, res) {},
10  delete: async function (req, res) {},
11};
12
13export default postController;
For rendering a list of posts:
1list: async function (req, res) {
2  const posts = await prisma.post.findMany();
3
4  res.render("index", {
5    posts,
6  });
7},
For showing one single post:
1show: async function (req, res) {
2  const post = await prisma.post.findUnique({
3    where: {
4      id: Number(req.params.id),
5    },
6  });
7
8  res.render("post/show", {
9    post,
10  });
11},
For creating a new post:
1new: async function (req, res) {
2  res.render("post/new");
3},
4
5create: async function (req, res) {
6  const { title, content } = req.body;
7  const image = req.file;
8
9  const post = await prisma.post.create({
10    data: {
11      title: title,
12      content: content,
13      image: image.path,
14    },
15  });
16
17  res.redirect(`/posts/${post.id}`);
18},
For editing an existing post:
1edit: async function (req, res) {
2  const post = await prisma.post.findUnique({
3    where: {
4      id: Number(req.params.id),
5    },
6  });
7
8  res.render("post/edit", {
9    post,
10  });
11},
12
13update: async function (req, res) {
14  const { title, content } = req.body;
15  const image = req.file;
16
17  if (image) {
18    const post = await prisma.post.update({
19      where: {
20        id: Number(req.params.id),
21      },
22      data: {
23        title: title,
24        content: content,
25        image: image.path,
26      },
27    });
28
29    res.redirect(`/posts/${post.id}`);
30  } else {
31    const post = await prisma.post.update({
32      where: {
33        id: Number(req.params.id),
34      },
35      data: {
36        title: title,
37        content: content,
38      },
39    });
40
41    res.redirect(`/posts/${post.id}`);
42  }
43},
For deleting a post:
1delete: async function (req, res) {
2  const post = await prisma.post.delete({
3    where: {
4      id: Number(req.params.id),
5    },
6  });
7
8  res.redirect("/");
9},
Users and tags
Before we wrap up this lesson, you also need to create the user and tag section of our blog app, including the routes, controllers, and the view templates. Because the next lesson, we are going to discuss the relations between the post, tag, and the user, and how they can be connected together.
We encourage you to do this yourself as a practice, but if you need extra assistance, here is a demo project we've created.