Consider this scenario: You are building a blog application and want to add a feature that allows the user to see a list of articles written by a specific author. How can you implement this feature?
To solve this problem, we must discuss relations. For a real-life application, the tables in your database are usually interconnected, meaning they have some kind of relationship with each other. For instance, in our blog application, each user could have multiple posts, and each post could have multiple tags.
In this lesson, we are going to discuss how to create such relations in an Express.js application using Prisma.js.
The one-to-one relation
There are three most fundamental types of relations.
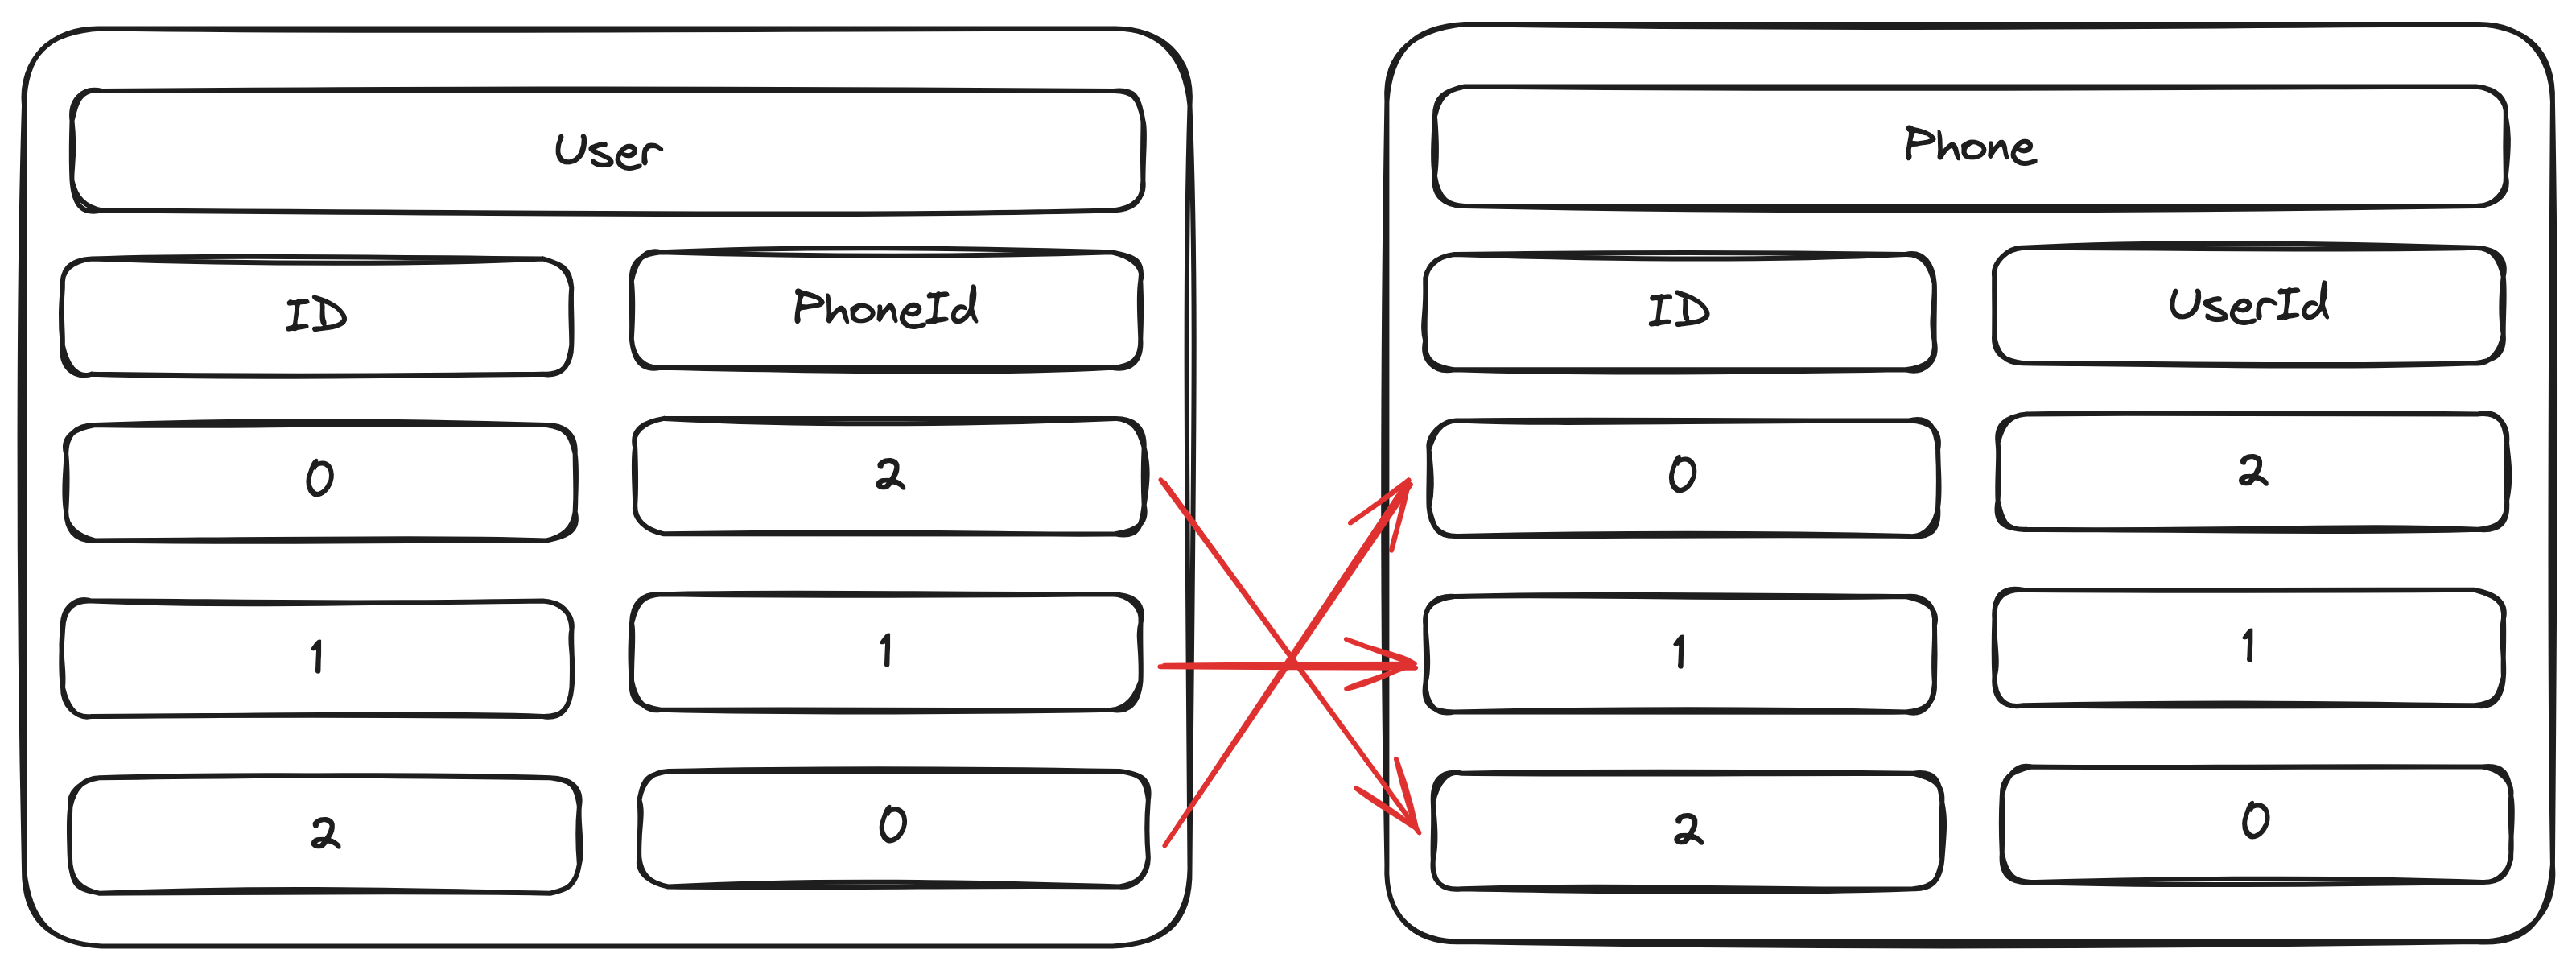
First of all, there is the one-to-one relation, meaning each record in table A owns just one record in table B, and vice versa. For example, each user could have one phone, and each phone only belongs to one user.
To achieve such a relation, your User table should have a phoneId column, storing the id of the phone that each user owns. Of course, you could choose a different name for that column.
Alternatively, you could create a userId column in the Phone table, storing the user to whom each phone belongs.
For instance, the following example creates a one-to-one relation between User and Phone using Prisma:
1model User {
2  id      Int      @id @default(autoincrement())
3
4  phone   Phone    // This is used by Prisma internally. It will not create a "phone" column.
5}
6
7model Phone {
8  id     Int  @id @default(autoincrement())
9
10  user   User @relation(fields: [userId], references: [id])  // This is used by Prisma internally. It will not create a "user" column.
11  userId Int  @unique  // Create a userId column in the Phone table.
12}
Pay attention to lines 4 and 10, they don't actually create columns phone and user, and instead, they are used internally by Prisma, allowing you to retrieve the corresponding phone records from the User model using the Prisma client, and vice versa. We will discuss exactly how to do this later.
The one-to-many relation
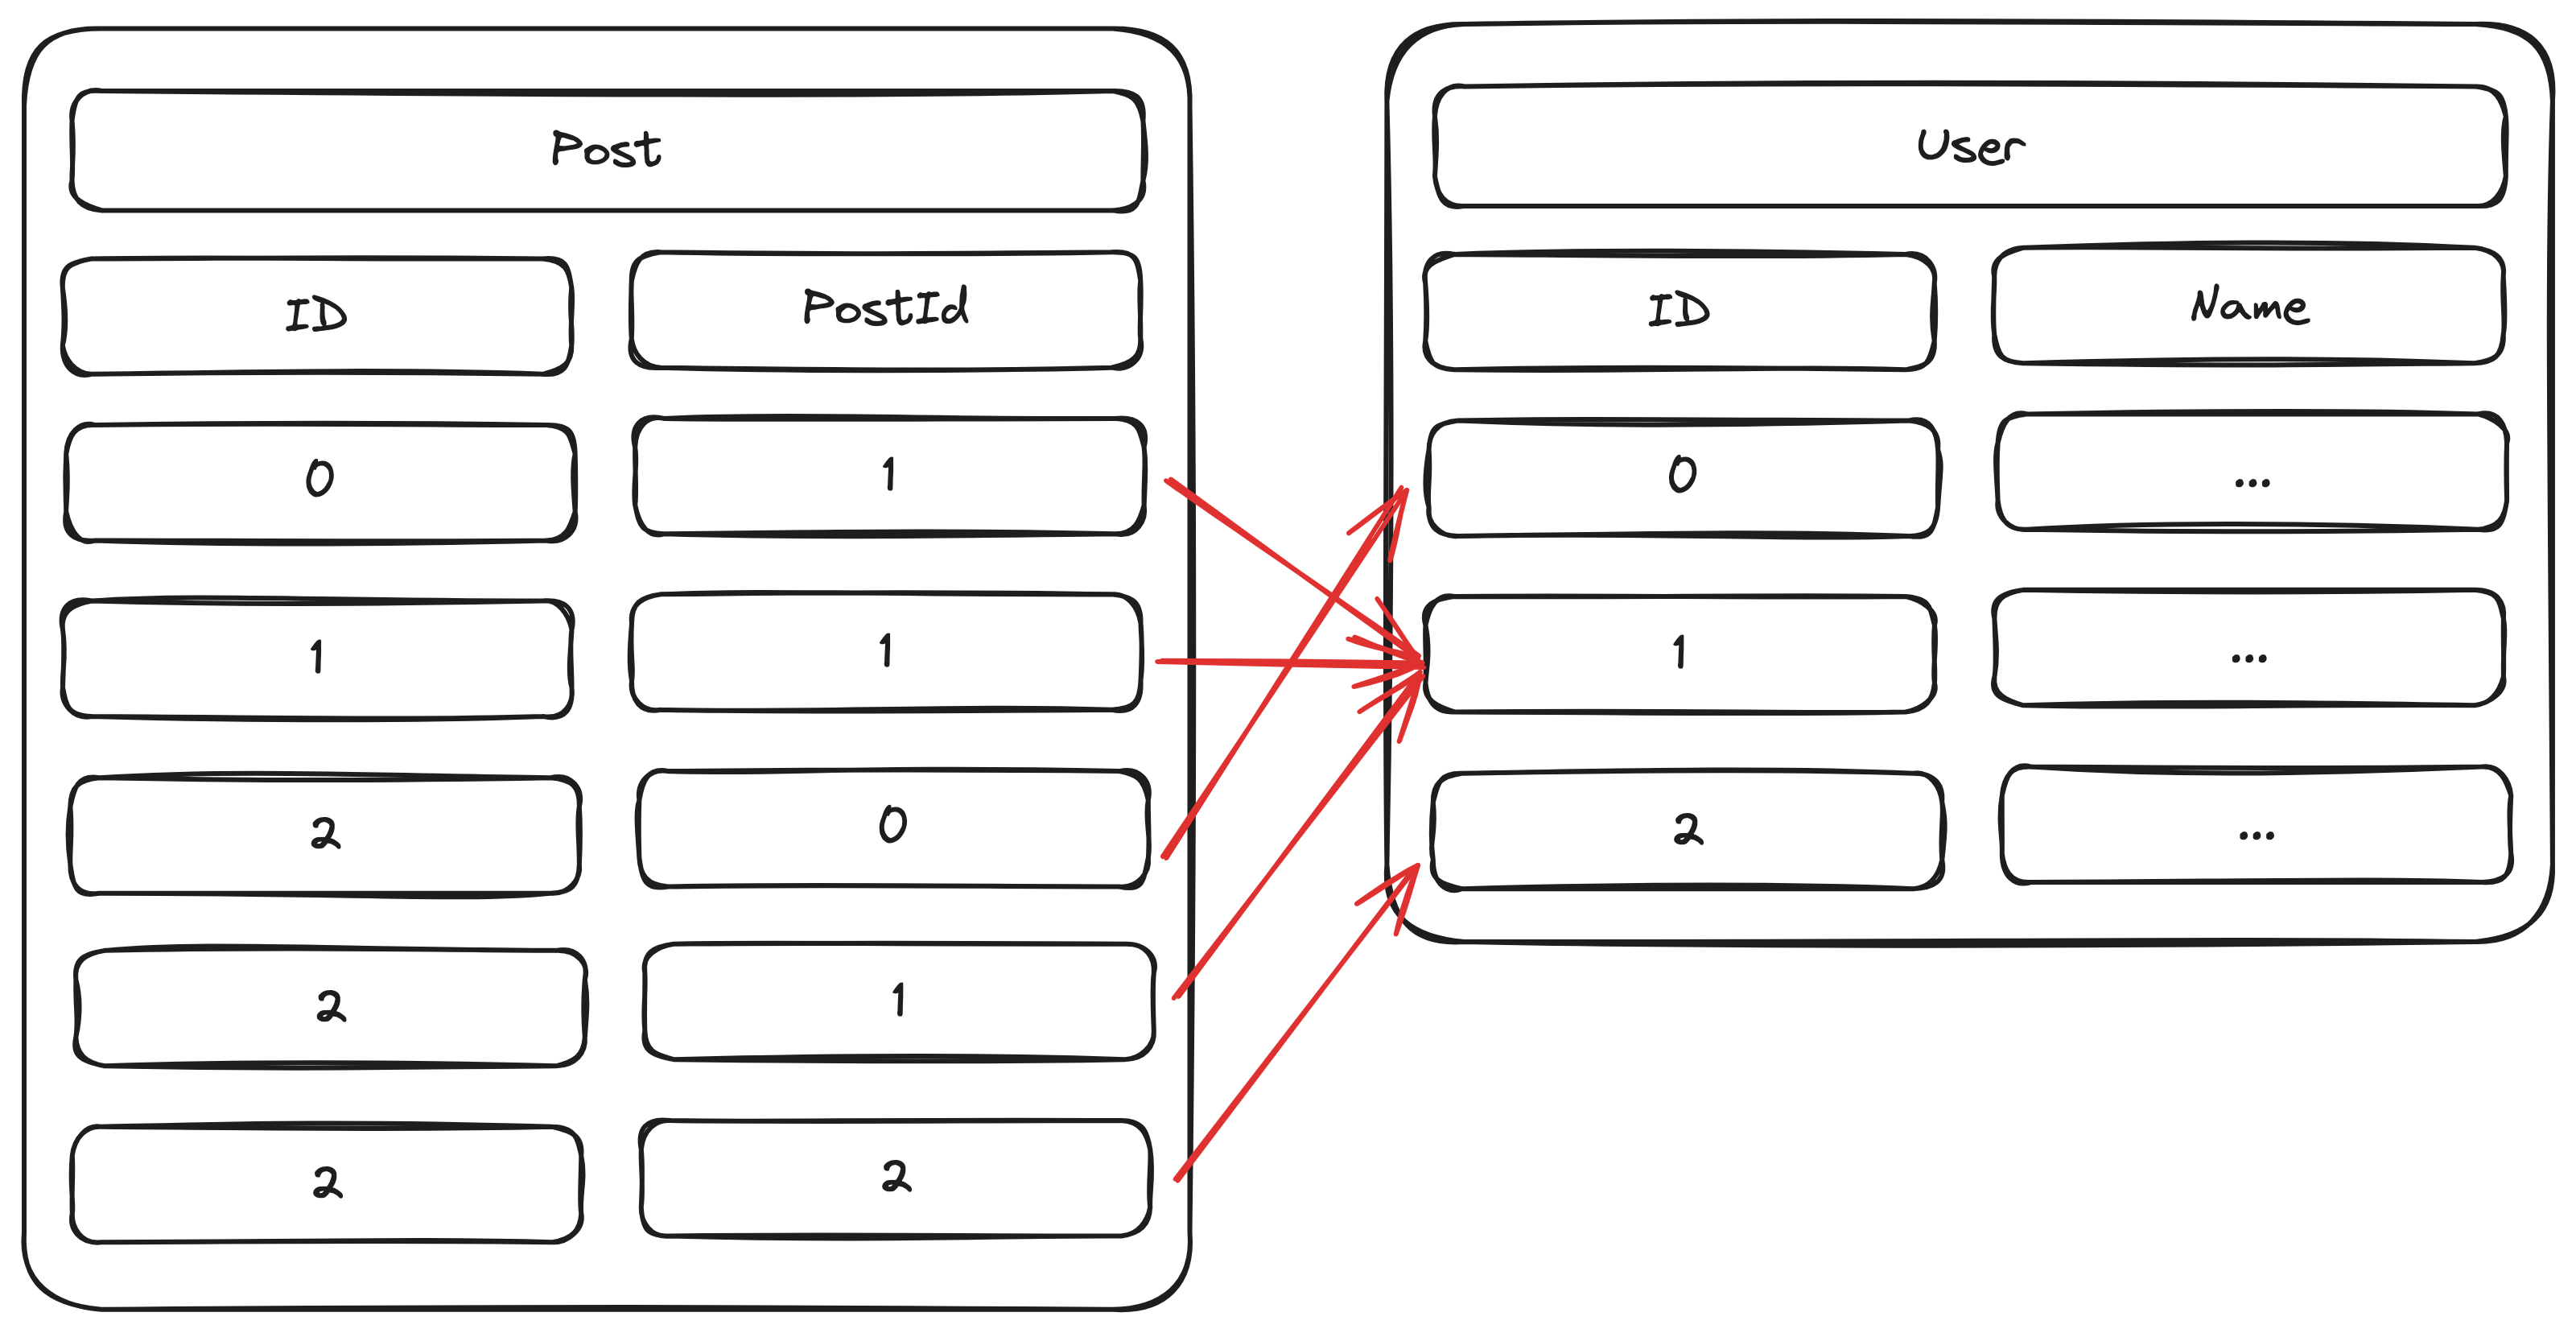
The one-to-many relation means that each record in table A owns multiple records in table B, but each record in B only belongs to one record in A. For example, in our blog application, each user could write multiple posts, but each post only belongs to one user.
To create such a relation, you need to create a userId in the Post table, storing the user that each post belongs to.
The following example creates a one-to-many relation between User and Post:
1model User {
2  id    Int     @id @default(autoincrement())
3
4  posts Post[]
5}
6
7model Post {
8  id          Int      @id @default(autoincrement())
9
10  author      User     @relation(fields: [authorId], references: [id])
11  authorId    Int      @default(1)
12}
The many to many relation
The many-to-many relation is a bit more complex. It describes the relation where each record in table A owns multiple records in table B, and each record in table B owns multiple records in table A. For instance, each post could have multiple tags, and under each tag, there could be multiple posts.
To describe such a relation, you'll need to create a separate pivot table that looks like this:
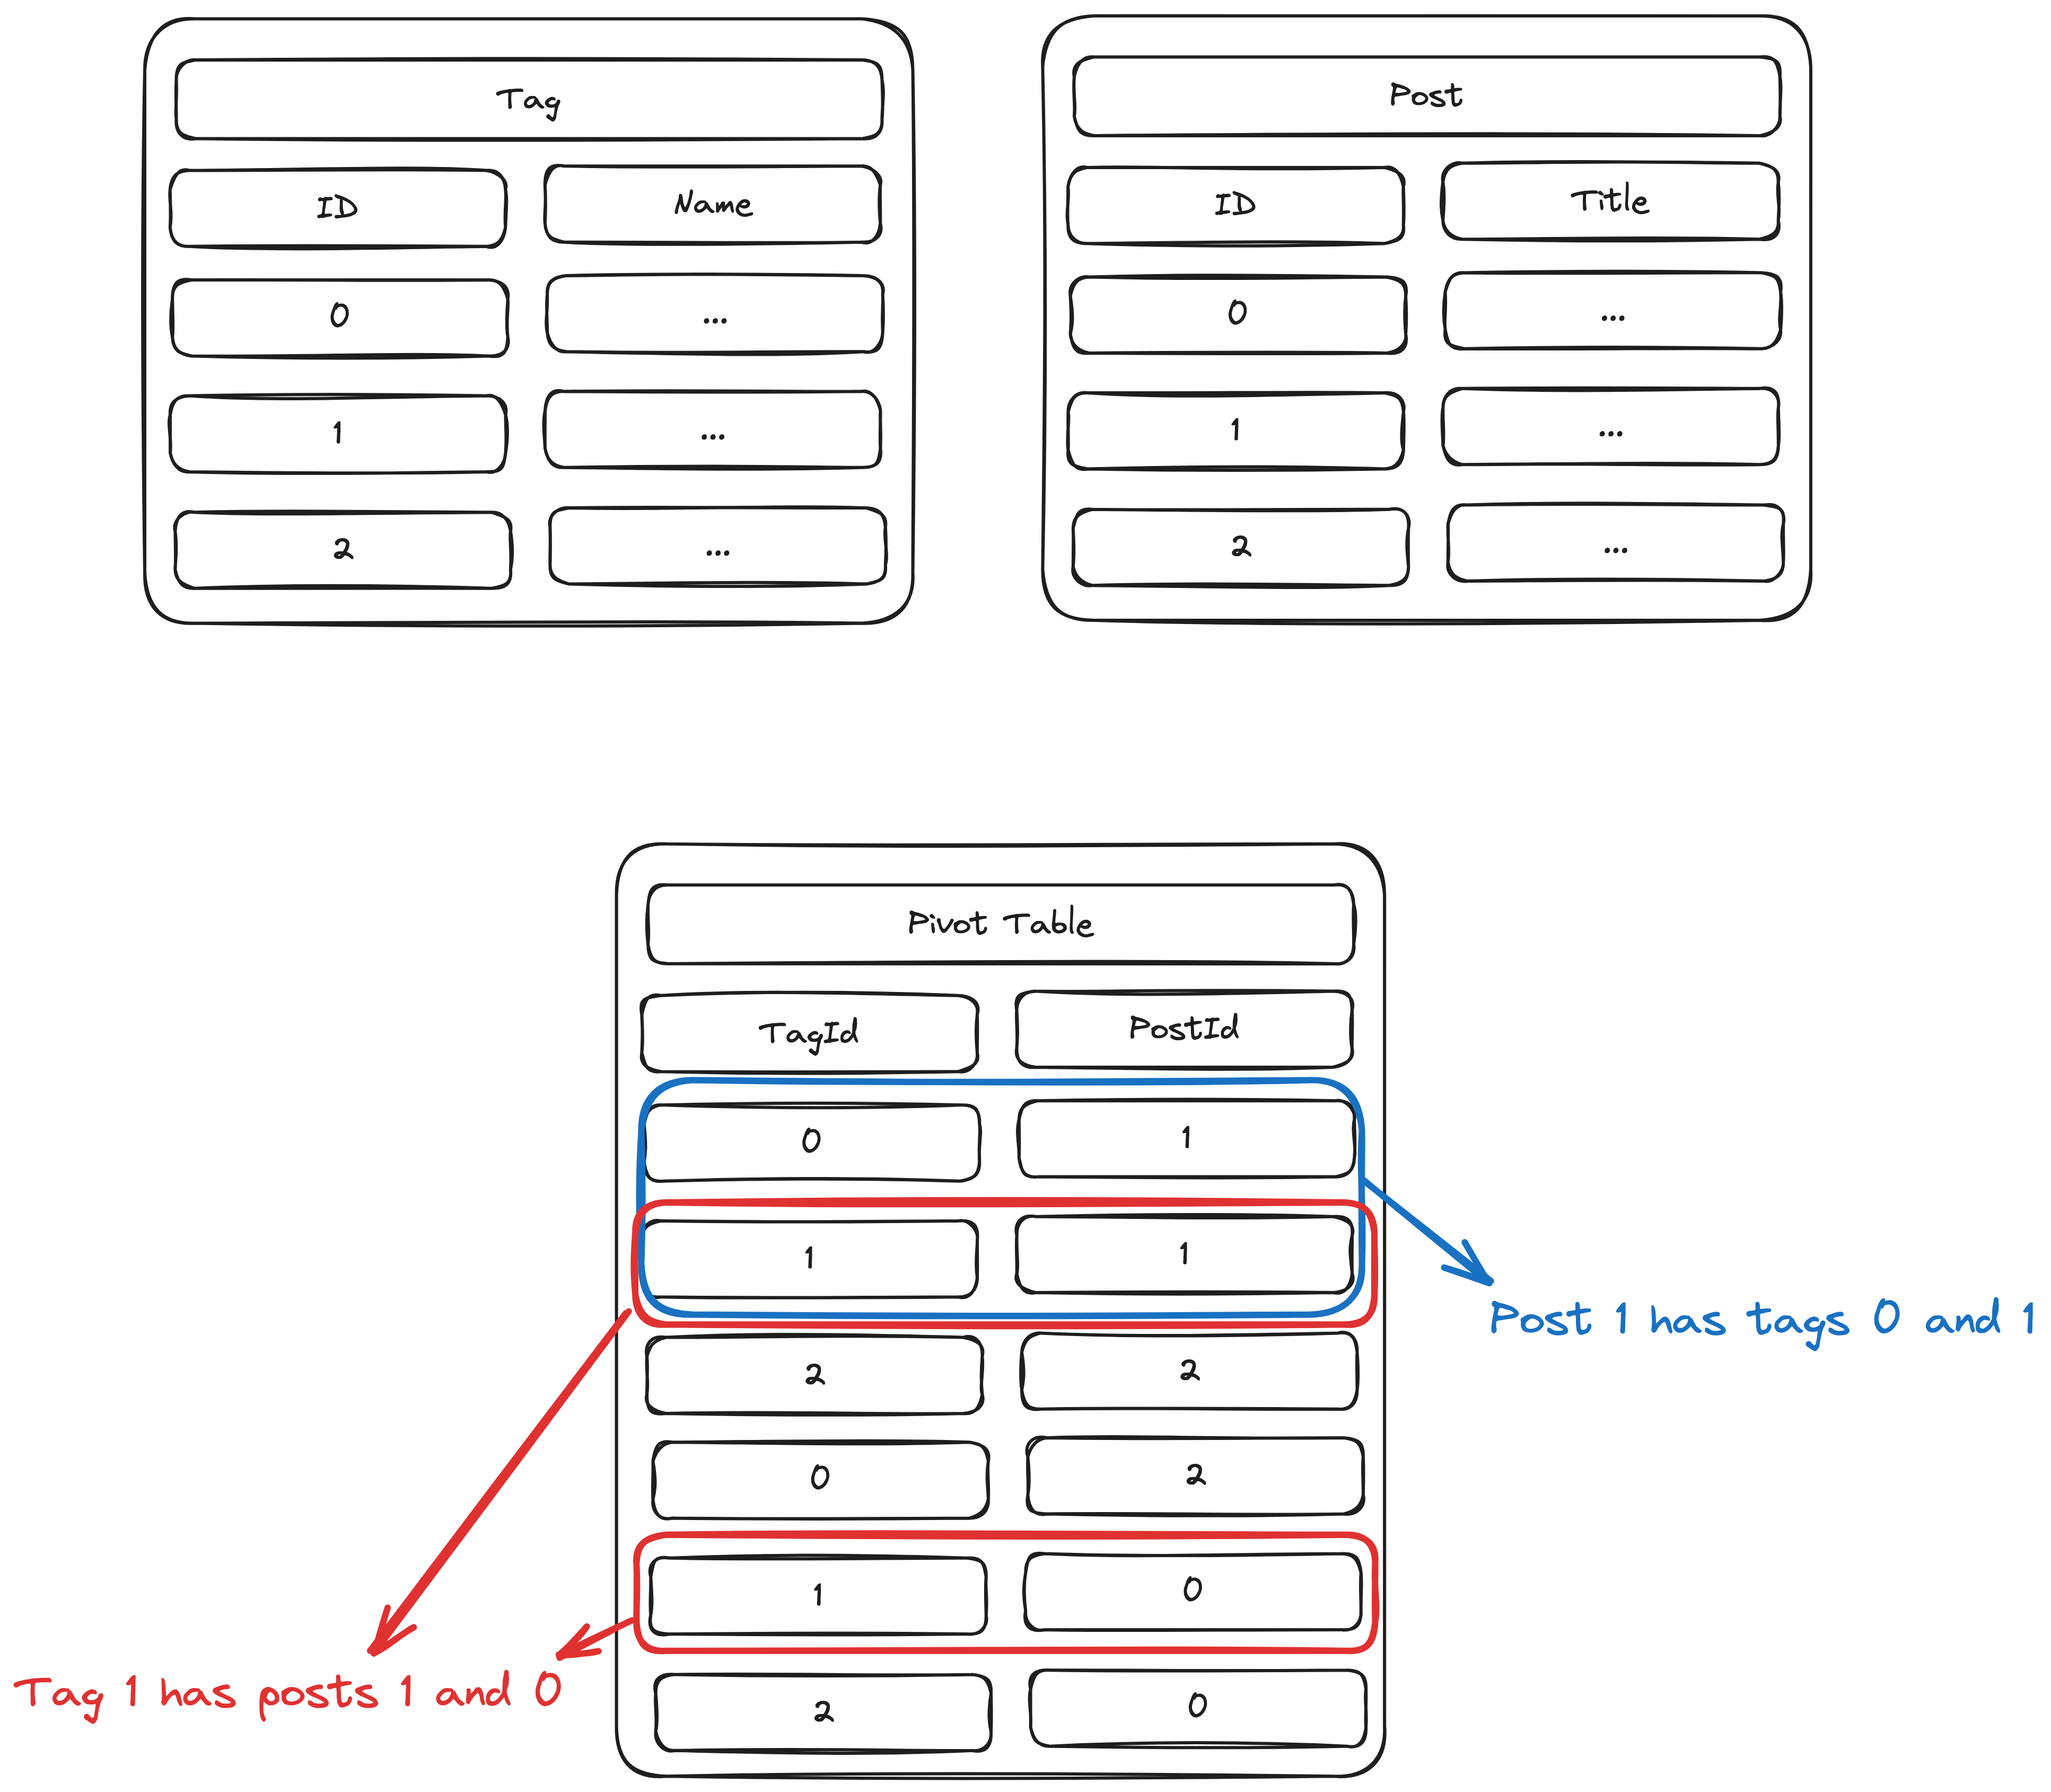
This table has two columns, postId and tagId. To locate the tags for each post, index the postId column to find the corresponding tagId. To locate the posts under each tag, index the tagId to find the corresponding postId.
The following example creates a many-to-many relation between Post and Tag:
1model Post {
2  id   Int      @id @default(autoincrement())
3
4  tags Tag[]
5}
6
7model Tag {
8  id    Int    @id @default(autoincrement())
9
10  posts Post[]
11}
But wait, where is the pivot table? This is one of the major benefits of using an ORM framework. Prisma will detect that you are creating a many-to-many relation and automatically create the pivot table for you.
Update Prisma schema
Next, let's put the concept into application, and update our old Prisma schema. As mentioned before, you can create a one-to-many relation between User and Post like this:
1model User {
2  id    Int     @id @default(autoincrement())
3  email String  @unique
4  name  String
5
6  posts Post[]
7}
8
9model Post {
10  id          Int      @id @default(autoincrement())
11  title       String
12  content     String?
13  image       String   @default("")
14  isPublished Boolean  @default(false)
15  createdAt   DateTime @default(now())
16
17  author      User     @relation(fields: [authorId], references: [id])
18  authorId    Int      @default(1)
19}
And then, you also need a many-to-many relation between Post and Tag:
1model User {
2  id    Int     @id @default(autoincrement())
3  email String  @unique
4  name  String
5
6  posts Post[]
7}
8
9model Post {
10  id          Int      @id @default(autoincrement())
11  title       String
12  content     String?
13  image       String   @default("")
14  isPublished Boolean  @default(false)
15  createdAt   DateTime @default(now())
16
17  author      User     @relation(fields: [authorId], references: [id])
18  authorId    Int      @default(1)
19
20  tags        Tag[]
21}
22
23model Tag {
24  id    Int    @id @default(autoincrement())
25  name  String
26
27  posts Post[]
28}
Apply this new schema with the following command:
1npx prisma migrate devAlthough this is not necessary, but if you are interested, take a look at the generated SQL file.
1-- CreateTable
2CREATE TABLE "_PostToTag" (
3    "A" INTEGER NOT NULL,
4    "B" INTEGER NOT NULL,
5    CONSTRAINT "_PostToTag_A_fkey" FOREIGN KEY ("A") REFERENCES "Post" ("id") ON DELETE CASCADE ON UPDATE CASCADE,
6    CONSTRAINT "_PostToTag_B_fkey" FOREIGN KEY ("B") REFERENCES "Tag" ("id") ON DELETE CASCADE ON UPDATE CASCADE
7);
8
9-- RedefineTables
10PRAGMA foreign_keys=OFF;
11CREATE TABLE "new_Post" (
12    "id" INTEGER NOT NULL PRIMARY KEY AUTOINCREMENT,
13    "title" TEXT NOT NULL,
14    "content" TEXT,
15    "image" TEXT NOT NULL DEFAULT '',
16    "isPublished" BOOLEAN NOT NULL DEFAULT false,
17    "createdAt" DATETIME NOT NULL DEFAULT CURRENT_TIMESTAMP,
18    "authorId" INTEGER NOT NULL DEFAULT 1,
19    CONSTRAINT "Post_authorId_fkey" FOREIGN KEY ("authorId") REFERENCES "User" ("id") ON DELETE RESTRICT ON UPDATE CASCADE
20);
21INSERT INTO "new_Post" ("content", "createdAt", "id", "image", "isPublished", "title") SELECT "content", "createdAt", "id", "image", "isPublished", "title" FROM "Post";
22DROP TABLE "Post";
23ALTER TABLE "new_Post" RENAME TO "Post";
24PRAGMA foreign_key_check;
25PRAGMA foreign_keys=ON;
26
27-- CreateIndex
28CREATE UNIQUE INDEX "_PostToTag_AB_unique" ON "_PostToTag"("A", "B");
29
30-- CreateIndex
31CREATE INDEX "_PostToTag_B_index" ON "_PostToTag"("B");
Line 2 to 7 creates the pivot table we mentioned above, and in this case, it comes with two columns, A and B. A references to the post ids, and B references the tag ids.
Line 11 to 20 update the Post table by adding a new authorId column.
How Prisma client works with relations
Previously, we covered how to use the Prisma client to create, retrieve, update, and delete records. And after understanding the different relations between database tables, we must also discuss how to retrieve and update the related records as well.
Retrieving related records
First of all, recall how you could retrieve a single record:
1const post = await prisma.post.findUnique({
2  where: {
3    id: Number(req.params.id),
4  },
5});
This example retrieves a single post record based on its id. In practice, this post might have some kind of relationship with other tables. As we've explained before, this post could belong to an author and has multiple tags. To retrieve the records that are related to this post, add a include key:
1const post = await prisma.post.findUnique({
2  where: {
3    id: Number(req.params.id),
4  },
5  include: {
6    author: true,
7    tags: true,
8  },
9});
This example will retrieve the related author and tags, which can be passed to the views together with the post.
1show: async function (req, res) {
2  const post = await prisma.post.findUnique({
3    where: {
4      id: Number(req.params.id),
5    },
6    include: {
7      author: true,
8      tags: true,
9    },
10  });
11
12  res.render("post/show", {
13    post,
14  });
15}
views/post/show.pug
1extends ../layout.pug
2
3block meta
4    title #{post.title}
5
6block content
7    img(src=`/${post.image}`, alt="", srcset="", width="500")
8    h1 #{post.title}
9    div #{post.content}
10    p By #{post.author.name}
11
12    p Tags:
13    each tag in post.tags
14        li
15            a(href=`/tags/${tag.id}`) #{tag.name}
16
17    a(href=`/posts/edit/${post.id}`) Edit this post
Adding related records
When it comes to adding relations, things become a bit tricky. For example, you are trying to create a new post, and you need the user to pick an author. The first thing you need to do is pass all available authors to new.pug, so that the user can choose one from the list.
1new: async function (req, res) {
2  const authors = await prisma.user.findMany();
3  const tags = await prisma.tag.findMany();
4
5  res.render("post/new", {
6    authors,
7    tags,
8  });
9},1extends ../layout.pug
2
3block meta
4 title Create New Post
5
6block content
7 form(id="newPost")
8 label(for="title") Title:
9 input(type="text", name="title", id="title")
10
11 label(for="content") Content:
12 textarea(name="content", cols="30", rows="10", id="content")
13
14 label(for="image")
15 input(type="file", name="image", id="image")
16
17 label(for="author") Author:
18 select(name="author", id="author", required)
19 option(value="") Please choose an author
20 each author in authors
21 option(value=`${author.id}`) #{author.name}
22
23 input(type="submit", value="Submit")
24
25 script.
26 . . .When the user clicks Submit, a POST request should be sent to the controller.
1document.addEventListener("DOMContentLoaded", function () {
2  . . .
3  const authorInput = document.getElementById("author");
4
5  const formData = new FormData();
6
7  . . .
8
9  authorInput.addEventListener("change", function () {
10    formData.set("author", authorInput.value);
11  });
12
13  form.addEventListener("submit", async function (event) {
14    event.preventDefault(); // Prevent the default form submission
15
16    await fetch("/posts/new", {
17      method: "POST",
18      body: formData,
19    }).then((data) => (window.location.href = data.url));
20  });
21});
The controller will take the transferred data and create a new record in the database. However, this time, you must include the corresponding relation as well, which can be created using the connect key.
1create: async function (req, res) {
2  const { title, content, author } = req.body;
3  const image = req.file;
4
5  const post = await prisma.post.create({
6    data: {
7      title: title,
8      content: content,
9      image: image.path,
10      author: {
11        connect: {
12          id: Number(author),
13        },
14      },
15    },
16  });
17
18  res.redirect(`/posts/${post.id}`);
19},
In this example, each post has only one author, so the connect key accepts a single object, which provides the author's id.
But what about tags? As you know, each post could have multiple tags, so in this case, you must use a <select> field with a multiple attribute.
1extends ../layout.pug
2
3block meta
4    title Create New Post
5
6block content
7    form(id="newPost")
8        label(for="title") Title:
9        input(type="text", name="title", id="title")
10
11        label(for="content") Content:
12        textarea(name="content", cols="30", rows="10", id="content")
13
14        label(for="image")
15        input(type="file", name="image", id="image")
16
17        label(for="author") Author:
18        select(name="author", id="author", required)
19            option(value="") Please choose an author
20            each author in authors
21                option(value=`${author.id}`) #{author.name}
22
23        label(for="tags") Tags:
24        select(name="tags", id="tags", multiple, required)
25            option(value="") Please choose tags
26            each tag in tags
27                option(value=`${tag.id}`) #{tag.name}
28
29        input(type="submit", value="Submit")
30
31    script.
32        . . .
This field behaves a bit differently. Instead of directly accessing the value, you need to use the selectedOptions, because value will return all available options, not just the selected ones.
1document.addEventListener("DOMContentLoaded", function () {
2  . . .
3  const tagsInput = document.getElementById("tags");
4
5  const formData = new FormData();
6
7  . . .
8
9  tagsInput.addEventListener("change", function () {
10    const selected = Array.from(tagsInput.selectedOptions).map(
11      ({ value }) => value
12    );
13
14    formData.set("tags", selected);
15  });
16
17  form.addEventListener("submit", async function (event) {
18    event.preventDefault(); // Prevent the default form submission
19
20    await fetch("/posts/new", {
21      method: "POST",
22      body: formData,
23    }).then((data) => (window.location.href = data.url));
24  });
25});
Array.from() creates an array based on the selected options, and we are using map() to restructure the array so that only the necessary information remains. The restructured array should look like this:
1[1, 2, 3, 4, 5];This array will then be packed inside formData and sent to the controller to be processed. However, remember that only strings can be transferred in an HTTP request, which means this array will be converted into a string.
So, in the corresponding controller, you need to first convert the string back into an array and then make sure it has the following format:
1[
2  {
3    id: 1,
4  },
5  {
6    id: 2,
7  },
8];1create: async function (req, res) {
2 const { title, content, author, tags } = req.body;
3 const image = req.file;
4
5 const newTags = tags.split(",").map((element) => {
6 return { id: Number(element) };
7 });
8
9 const post = await prisma.post.create({
10 data: {
11 title: title,
12 content: content,
13 image: image.path,
14 author: {
15 connect: {
16 id: Number(author),
17 },
18 },
19 tags: {
20 connect: newTags,
21 },
22 },
23 });
24
25 res.redirect(`/posts/${post.id}`);
26},The reformatted array will be passed to the connect key, which, in this case, accepts an array of objects instead of a single one.
Updating controllers and views
Before we wrap up this lesson, please also update the other controllers and views. You are encouraged to try this yourself, but if you need further assistance, the complete source code can be found here under the add relations directory.